
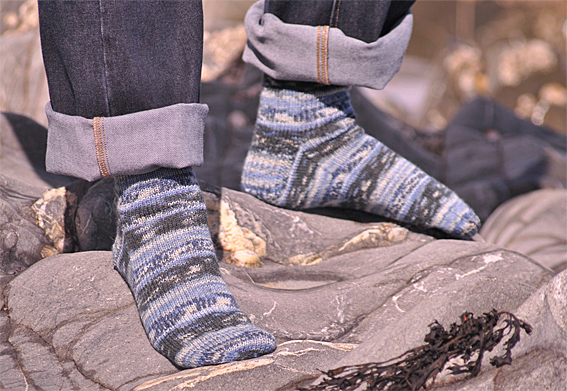
The final part of the How to Knit Your Sock series looks at knitting the foot, shaping the toe, grafting the toe, finishing and blocking your new socks.
This series on knitting a sock in four step by step articles is aimed at someone who is knitting their first sock.
- Part 1: you covered the anatomy of a sock, knitting the cuff and the leg section.
- Part 2: you learn how to knit a strengthened heel flap which gives comfort and helps lengthen the lifespan of your hand knit sock and finally, turn your sock heel.
- Part 3: shows how to set up for the gusset and gusset shaping.
You are now ready to continue your sock by knitting the foot.
Abbreviations
- k knit
- p purl
- ssk slip 2 stitches knitwise, one at a time, to right needle, then insert left needle from left to right into front loops and knit 2 stitches together – 1 stitch decreased
- k2tog knit 2 stitches together – 1 stitch decreased
- st stitch
- st st stocking stitch/stockinette stitch
Foot
When you finish knitting the gusset there are 15 stitches on each needle.

Many patterned socks continue the pattern on the top of the foot. However, for comfort, the sole is normally knit in stocking stitch. For this plain sock all rounds are knit apart from the slip stitch heel and ribbed cuff.
- For UK size 5/6 or European size 38/39
- Work 42 rounds.
- You want to finish knitting the foot approximately 3.75 cm/1 1/2″ from the tip of your toe.
- If the sock is being knit using pure wool, I err on having the sock a little longer rather too neat, to allow for an element of shrinkage during washing. A slightly felted wool sock, is a very warm sock on a cold day, so long as it is still the right size for you.
This can be adjusted to suit your own foot size. I normally try on my sock at this stage. Sometimes, if the sock yarn I am using is finer like Zauberball, I may add an extra couple of rounds. The Zappos Shoe Size Conversion Chart for US, UK and European sizes may be useful.

The Toe
100% wool socks tend to wear into holes much quicker than socks that have been knit using sock yarn which normally has nylon added for strength often in a ratio of 75% wool to 25% nylon. I often use a smaller sized set of double pointed needles to help give the toe area a little more strength. As this step by step series has been written with the beginner knitting their first sock in mind, I have assumed you only have one set of double pointed needles for knitting your sock, so the whole sock is knit using the same size set of double pointed needles.
I am going to give two choices for knitting the toe. Both are based on the paired decrease, but one toe is more ’rounded’ and the other a bit more ‘pointy’. The socks that I have photographed while writing this series of posts have the ’rounded’ version of the toe. However, for both toe options, the decrease round is the same.
The Decrease Round
The round always starts and ends at the centre point of the sock’s sole.

- The decrease round – Round 1: For Needle 1 and Needle 3: knit to the last 3 sts, k2tog, k1

- The decrease round – Round 1: For Needle 2 and Needle 4: k1, ssk, knit to the end of the needle.
The decrease round is used to create the shaping in the toe for a comfortable neat fit.

Toe Option One – ‘Round’ Paired Decrease Toe
- Round 1: work decrease round
- Rounds 2, 3 & 4: knit
- Repeat rounds 1-4 two more times.
Toe Option Two – Paired Decrease Toe
- Round 1: work decrease round
- Rounds 2, 3 & 4: knit
- Round 5: work decrease round
- Round 6 & 7: knit
- Repeat rounds 5-7 once more
- Round 11: work decrease round
- Round 12: knit
- Repeat rounds 11 & 12 two more times.
The decreasing for this toe is worked over a more gradual 16 rounds to this stage.

- Work the decrease round for all remaining rounds for both toe option 1 or 2.
- Until there are two stitches remaining on each needle.
- Slip the stitches from needle 2 onto needle 1
- Slip the stitches from needle 4 onto needle 3
- You are ready to Start Grafting the Toe
Now please take a moment and try on your sock. It is easier to unknit a few rounds at this stage if your sock feels a bit too tight around your toes than it is once you have grafted the toe and sewn in the ends. You will find as you knit more socks that you will know how many rounds to knit for the foot and which toe shaping you find most comfortable.

Grafting the Toe
Grafting or Kitchener Stitch is an excellent way of finishing the toe in a smooth neat way. But if you prefer, you can miss out the grafting stage and gather the remaining 8 stitches, pull them tight, and sew in the end firmly.
Set Up for Grafting
To graft you need to do a set up stage first.

- Insert the threaded tapestry needle into the first knit stitch on the front double pointed needle (the dpn nearest to you) as if to purl, then pull it through and leave the stitch on the dpn.

- Then, insert the tapestry needle into the first knitted stitch on the back dpn as if to knit, and pull the tapestry needle through leaving the stitch on the needle.
Grafting Stage 1 – Front Needle

- Insert the tapestry needle into the first stitch on the front dpn as if to knit and slip the stitch off the dpn
- I normally pull the yarn through this stitch fully.

- Then, insert the tapestry needle into the next stitch on the front dpn as if to purl, and pull it through and leave this stitch on the double pointed needle.
Grafting Stage 2 – Back Needle

- Insert the tapestry needle into the first knit stitch on the back double pointed needle as if to purl, and slip this stitch off the dpn.

- Then, insert the tapestry needle into the next stitch on the back double pointed needle as if to knit, and pull the needle through leaving the stitch on the dpn.
- Continue repeating grafting stage 1 and then stage 2 until you have grafted all the stitches together. It is easy to use your tapestry needle to adjust the tension of the grafted stitches if they are slightly loose or tight.
Finishing At the Toe
In most patterns, they end with sentences such as ‘sew in any loose ends’. As this is a step by step series on knitting your first sock, I am covering every stage in detail and I’m not making any assumptions as to how advanced the knitter is who is knitting their first sock. When I was first knitting socks, I used to google surprisingly simple questions, and I now take the answers that I found out for granted.

- Take the needle through to the inside of the sock. Take care not to prick your finger or to take the needle through both sides of the sock.

- Turn the sock inside out.
- It is important to be careful you don’t sew both sides of the sock together when you are sewing in the loose end. I have done this more than once! Check for this before you cut off your yarn at the end.
- Start by slipping the needle through several of the ‘reverse stocking stitch bumps’ at the shaped edge.

- Then you ‘sew’ across the row of bumps working ‘with’ the bumps rather than against them, ‘up’

- and ‘down’ with the flow of the bumps.
- Take care not to pull the yarn too tight which causes the stitches on the right side to look distorted.

- Finally, slip the needle through several of the bumps along the other shaped edge, pull the needle through.
- Cut the end leaving about 2 cm which prevents the end from migrating through to the right side.
Finishing at the Cuff

- Create a little slip knot at the cast on edge of the cuff where the first round started and ended.
- This prevents the edge from stretching out of shape at this point.

- Then carefully ‘follow’ the nearest rib (on the wrong side), taking the needle behind the v-shape from one side to the other

- After about an 2 cm, cut the yarn, leaving an end of about 2 cm in length.
Blocking Your Socks
- To block your socks you need to have sock blockers. There are many different types available.
- Use shampoo, woolite or some other detergent for washing hand knit items to wash your socks. Put them into a bowl of sudsy luke warm water and gently swirl them around in the water with your hand. Then leave them for a few minutes to soak.
- Rinse with luke warm water taking care not to overly agitate the socks especially if they are knit using wool.
- Take the socks out of the water and lay flat inside a folded towel. Press the water out of the sock. The folded towel absorbs the excess water.
- Place each of the socks on to a sock blocker and allow to dry naturally.

To be honest, I only block hand knit socks if they are a gift for someone. I wear hand knit socks every day and don’t have the time to block every sock I wear after every wash.
I normally, look forward to wearing my new pair of socks the next day and don’t want to wait for them to wash and dry slowly.
The main reason I prefer to knit my socks using sock yarn is that they can be machine washed very successfully. If you use pure wool you will need to hand wash the socks gently or they will shrink. I knit most of my socks using sock yarn because I have lost some pairs of wool socks to shrinkage mainly because once they are in general usage, I forget which socks are made from pure wool.
Congratulations, you have finished knitting your first sock. Enjoy knitting the second. Don’t forget to knit a second sock so that you have a pair to wear. It is very easy to fall into the grip of Sock-one-itis… The joy of seeing how the sock yarn or pattern looks and then moving onto a different sock project before you knit the second sock.

Leave a comment if you have any questions about part 4 of this series. I have used Opal sock yarn in the lovely Fairies and Elves colour 5523 to knit this pair of socks. Other great choices of yarn for knitting your next pair of socks would be Lang Jawoll Magic Stripes, KS Merino Silk 4ply and Crazy Zauberball. Choose your favourite sock yarn from the Yarn Shop. Or dive into your sock yarn collection and choose one of your special single skeins of sock yarn that you bought at a yarn festival. It is so much fun knitting your own socks and they are so comfortable to wear.
How to Knit Your Sock Links
- How to Knit Your Sock – Part 1
- How to Knit Your Sock – Part 2
- How to Knit Your Sock – Part 3
- Zappos Shoe Size Conversion Chart for US, UK and European sizes
- Shoe Size Charts for Knitting Socks – US sizes – My Jewel Thief Knits
- Grafting – Kitchener Stitch
- Knit 2 Socks at the Same Time
- Why Use Sock Yarn?
Nicolette, I am trying to find a way to access your part 4 sock pattern. Any suggestion?
Hi,
I have been using this pattern as my guide for years now and also shared it with friends, who asked me how to knit socks, because it’s just so good. Very easy to understand and follow.
I have been adding a cable design to the front of the socks to make them a bit more formfitting, as a found the socks a bit loose, but with the cable design they always fit like a glove. (It also make them look pretty.)
Thank you for the very comprehensive guide.
I simply cannot do the Kitchener stitch. Is there an alternative?
Hi Charlotte,
1. You could continue with the decrease rounds until you have 8 stitches and then cut the yarn leaving a tail of about 20cm/8″. Using a large-eyed needle like a tapestry needle and gather all the stitches, I normally go through the stitches a second time and then pull the yarn firmly and sew in the end securely.
2. You could turn the sock inside out when you reach the point of being ready to work the Kitchener stitch, and then you do a 3 needle bind off.
Both of these methods work well but you may want to knit an extra couple of rounds on the foot before starting the toe as these methods pull the last round of stitches tighter together where grafting adds a row of stitches.
Hope that helps. Nicolette
Charlotte I find when doing the Kitchener stitch if someone reads the steps.it helps me to understand the process .. Good Luck, Susie
I hope you’re still posting and teaching.
I found your sock lesson and I have to say these are the best, most concise, easy to follow directions I have ever seen. I’m so glad I found your site.
Thank you
Carole
Thank you
Hi Nicolette
I am proud to say that I’ve almost finished my first sock without too many hiccups. I do find the sock a little on the larger side -it’s quite loose particularly at the beginning. Do you have a fool proof system of reducing the whole pattern? I also found that when I was knitting up to the toe decrease section I knitted 30 rounds at best and that took me to the bottom of my big toe. This is where I am right now and wondering if the toe decrease is now in order. My little toe just peeks out from here. I am a size 39…
Thank you so much for your very comprehensive and well illustrated and worded instructions, you have removed my fear of sock knitting and I’ll be starting another pair shortly! This has been a good project during the social isolation of the COVID19 situation.
Many thanks
Dominique
Each year I take on a new challenge. The first year I learned to read and write and speak Korean. Last year was Transylvanian counted cross stitch. Before that was quilting. This year it is socks. I don’t stop until I can master each project. And then I found you!!! Numerous YouTube videos and I still could not wrap my head around turning a heel; your brain capacity slows down after 65. Your step-by-step instructions are brilliant. I LOVE YOU! Many many thanks!!!
Wow Stephanie, that is an impressive list of challenges! I hope you enjoy knitting lots of pairs of socks. Nicolette
Hi Nicolette
Thank you for this wonderful, easy to follow sock pattern….I have just finished knitting my second pair of socks using your pattern and I couldn’t be happier with the results!
Regards Jenny
Thank you for the useful pattern, I am on my 4th pair of socks.
Julie
Hi Nicolette,
I am well on my way to finishing my 4th pair of socks using your pattern.It has been a breeze. I used Kroll sock yarn to start and now I am using Premier yarn, Deborah Norville Serenty sock weight yarn. Anyway it is softer than the other. The only changes I make in your pattern is for a more rounded toe, I have been fiddling with that a bit. I always size 2, and cast on in 3.Size ones intimidate me.
Thanks for the useful pattern,
Julie
Hi Julie, I’m so pleased you’ve enjoyed using this sock pattern. The sock yarns you’ve been using sound gorgeous. I think they are brands that are easier to buy in US rather than here. I’d love to hear more about the changes you make to create a more rounded toe. So interesting! Many thanks, Nicolette
Hi…love your tutorial…I actually jumped ship from another pattern to your tutorial and yours made sense !!!…thank you…I do have a question…with the 60 stitch cast on , everything fits other than the foot section is too big…I have narrow and thin foot….for my next pair…how would I make the foot part smaller….decrease to less stitches per needle ?…from 15 per needle (60stitches) to ???….12 stitches per needle….the sock may look funny but fit well…????…thanks for your help !
Hi Loretta, Sorry not to reply sooner… You can easily do an additional round of decreasing to bring the total number of stitches down to 56 for knitting the foot section. I do the opposite when I’m knitting socks for my husband. He has slim legs so I usually cast on 60 stitches, but I reduce to 16 stitches on each needle for knitting his foot as he prefers socks with a 64 stitch foot. It works well. Haven’t noticed that the sock looks odd or anything like that but it definitely helps to have it feel comfortable on the foot. Always worth trying! Happy Sock Knitting, Nicolette
Hi Nicolette,
Hope this is not redundant–lost the first attempt to make a comment.
I have learned new methods of working a heel flap and turning the heel from this series of “How to Knit Your First Sock”. I stumbled onto it when I bought my Android Tablet a bit over a year ago. It came up somehow as an “app” so I downloaded it and am so glad I found it. I have knitted socks for over five years, and wish I had found it when I first began.
I just bookmarked the grafting part #4 on using the Kitchner Stitch. I use that and the one called “for those who hate the Kitchner stitch”, which uses a third knitting needle instead of a tapestry needle. Little difference in difficulty for my brain.
Thank you for a great beginning sock knitting tutorial.
Best to you, and Happy Easter. Joyce in Utah
Not at all redundant Joyce, so nice to be able to reply to you! I so love trying different styles of heel and toe! Never get bored knitting socks. All the different sock yarns and patterns and colours are so cool to knit with. At the moment I’m knitting the largest sock in a new two parter that I’m doing for the blog that gives a Basic Sock Pattern in 6 different sizes and shows the sizes for UK, EU, US and Foot Circumference in cm and inches. It has been fun knitting them all although I have asked myself a couple of times why I didn’t start with the largest sock and work my way down to the smallest. It does feel a little like the largest sock is taking a long time to knit. In some ways I think these two posts will lead on from the first series to make it easier to knit socks in different sizes. I’m so pleased you enjoy the series. Happy Easter to you too Joyce. Many thanks, Nicolette
Thank you so much for sharing your sock knitting step by step pattern! I can proudly say I have knitted my first sock thanks to you! There’s no stopping me now 🙂
So pleased you’ve finished your first sock Mona. You’ll love wearing them when you finish the second sock. Happy Sock Knitting, Nicolette
Hi Nicolette,
I have been looking through your shop and especially your blog, went all the way back because i liked it so much, so much information for a new socknitter, thank you very much for your clear information and lovely posts.
Best wishes,
Willemijn
Thank you Willemijn, delighted that you enjoyed your visit to the Knitting Squirrel. It is so much fun creating with the gorgeous yarns. Happy Knitting, Nicolette
Hi there…ready to start my 2nd sock. Do I pull out the yarn until the same colour blend is found? I’m using Opal in a multi-blend of greens-gold-amethyst-blues. The 1st sock was started in the blue tones, so do I search the skein until I find that again and start there, so the pattern will match?
Tks…happy knitting in 2016
Hi Karen, The first thing I always do is to look at the first sock and make sure that the colour I started with only shows up once in the repeat. If it shows up once, it is just a matter of unwinding until you reach the same position in the yarn colour repeat where you cast on previously. The tricky bit is to cast on the stitches from approximately the same place. When I’m casting on for the first sock, I usually make my slip knot at the intersection between two colours. It makes it easier to find the exact same position for casting on for the second sock.
It is trickier if it shows up twice. Then you need to unwind a little more so you can check that the colour coming next is the same as your first sock.
Have you just finished your first sock? Congratulations!!! You will love wearing them when you finish the second.
Let me know if you have any other questions. Happy Knitting, Nicolette
Hi Nikki, I’ve been knitting for 20+ years but this is the first time I’ve knit a pair of socks as they always looked really difficult. I followed your tutorial and they’ve turned out perfectly, even the Kitchener stitch was easy with your step by step instructions. Thank you so much for sharing. Christine. X
Thank you Christine. I’m delighted that your socks are a success. I hope you will have fun knitting many more! Nikki
Thank you Nikki – finally I can visualise Kitchener stitch! This is the clearest explanation I’ve ever seen and I can’t wait to do it this way on my next pair. I’ve been either gathering the last few stitches, or even, a few times, turning the whole sock inside out at the 16 stitches stage and knitting across both needles from the wrong side. It’s strong but leaves a bit of a ridge on the inside. – Linda x
Delighted that you found it helpful Linda.
Hi Linda, so pleased you found it helpful.