
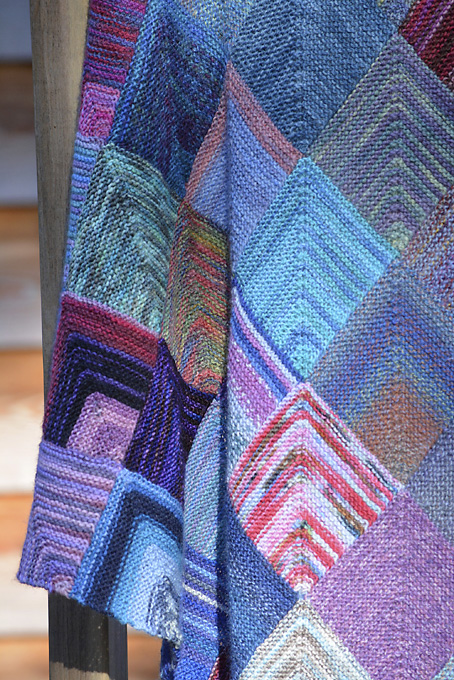
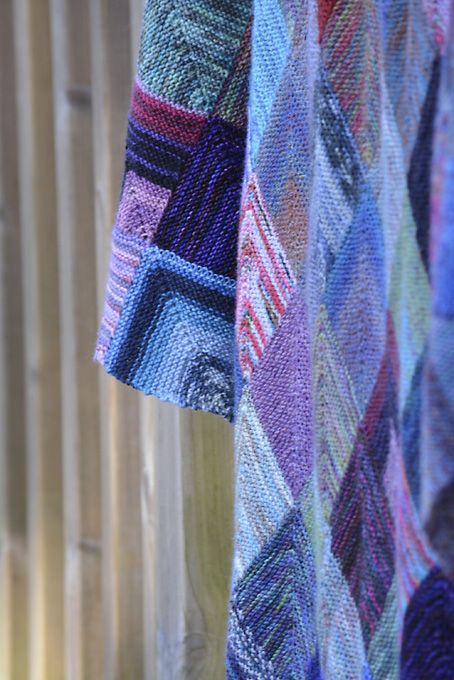
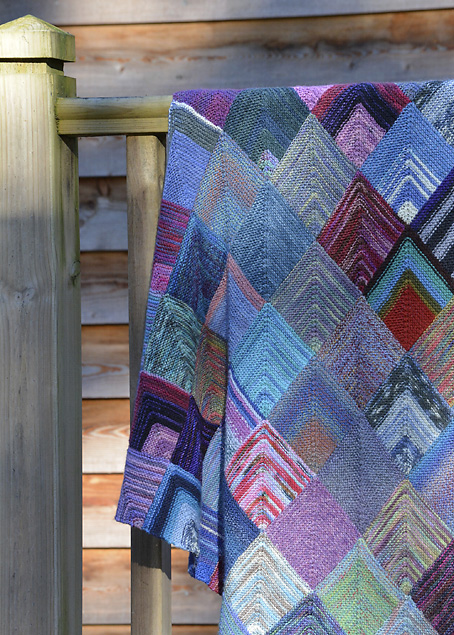
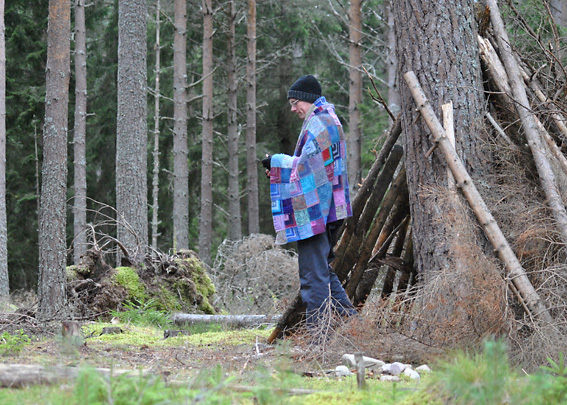
There are lots of different ways to knit a mitred square. This is how I knit my Mitred Square Blanket. I chose to use an analogous colour scheme of green, turquoise, teal, blue, purple, cerise as much as possible. Most of the yarns are either hand dyed: semi-solid, tonal, variegated, or commercial self patterning. A few other colours did creep in as part of a multi coloured variegated yarn or commercial sock yarn. These just add an extra sparkle to the finished blanket. I loved the tiny touches of orange, red, brown and zingy green.
This is a long post as I’ve taken lots of photos. I know that for many people I may go into too much detail, but I like to do the tutorial posts so that they will enable a beginner knitter to be able to do the project. This is actually a great project for a beginner as the mitred squares are easy to do.
Materials:
Assorted leftover sock yarn from other projects. I have also used 4 ply yarns. I have used the same colours between one and five times in a couple of cases. It really depended upon how much yarn I had. This project could also be done rather beautifully with a few colours of a long repeating yarn like the Lang Jawoll Magic, Lang Jawoll Magic Degrade, Schoppel Wolle Zauberball or Crazy Zauberball if you don’t have lots of sock yarns. It would also be a fun project for a knitting group who could swap sock yarn leftovers. In all I used about 75 different sock yarns in my mitred squares blanket. I adore how the repetition of the yarns the a cohesive look to the blanket.
Many people refer to their Mitred Square Blanket as a Cosy Blanket or a Memory Blanket. I look at the squares and can remember what each yarn was used for. I’ve used these yarns to knit socks, hats, shawls, fingerless mitts as well as knitting outfits for Sasha or Gregor dolls. But to be completely honest, I adore my blanket, not because of these memories but because it was a pleasure to knit and I chose to knit the blanket in my favourite selection of colours from my stash of leftover sock yarns.
Size of My Mitred Square Blanket:
The finished size of my mitred square blanket is 105cm (42″) x 140cm (56″).
Each mitred square weighs 6g. I didn’t worry if I hadn’t enough yarn to finish a square, I just used a different yarn to finish the square.
My Mitred Square Blanket is 11 squares x 15 squares in size (165 squares). It weighs approximately 1 kilo.
Each square measures 9.5cm x 9.5cm (3.75″ x 3.75″), but as the blanket grows in size the squares stretch a little bigger due to the weight of the surrounding squares.
My only rule when choosing which yarn to use next was that the same yarn shouldn’t be used within 2 blocks of each other.
Needles:
I used two 3.25mm (US 3) 20cm (8″) long Clover Takumi bamboo double pointed needles. You need to have the double points. I prefer the bamboo needles as I find them easier on my hands when I’m doing a lot of knitting. There is a lot of knitting in a mitred square blanket. The other good thing about the bamboo needles is that they aren’t as slippery as a metal needle so the stitches don’t slip off, even when there are only a couple of stitches on the needle. This is so handy when the blanket is being put away after you’ve finished knitting on it.
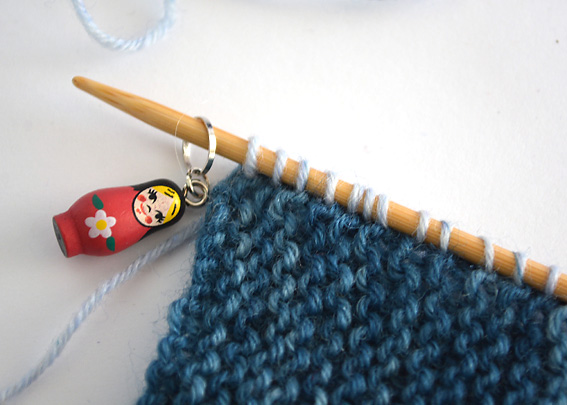
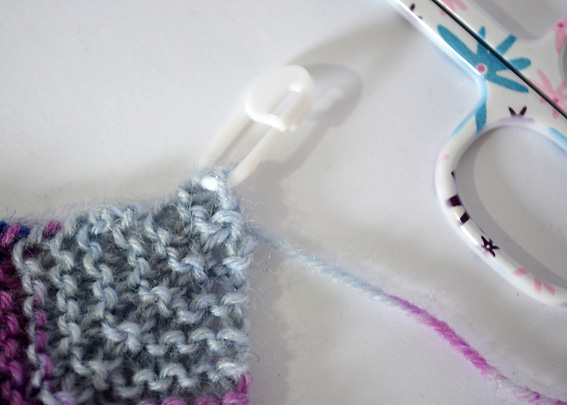
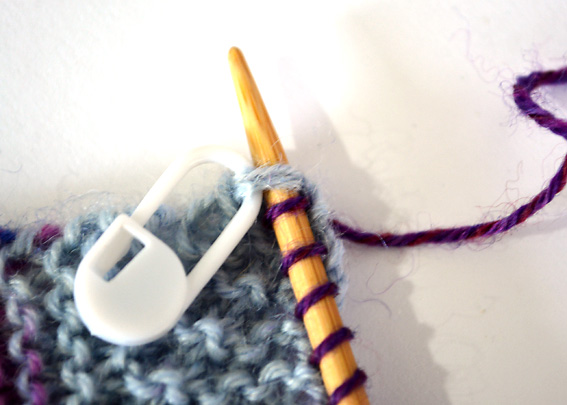
Other notions used: a locking stitch marker or safety pin and a stitch marker. If you’d prefer to sew in your ends a tapestry needle. I knit the yarn ends in as I went along and then snipped the ends to about 1cm (0.5″) long. The photo below shows the wrong side of my mitred square blanket and I think it looks reasonably neat. I don’t mind the odd little end.
How I Knit My Mitred Square Blanket:
I’m sure there are lots of different ways of knitting the mitred squares, this is how I did mine. I knit my squares in normal garter stitch as I wanted my blanket to be soft and fluid. You can tighten up the squares by knitting every stitch through the back loop. This causes each square to be a bit smaller.
Mitred Square 1:
- Using the 3.25mm double pointed needle, cast on 48 stitches, I used a long tail cast on.
- Row 1 (WS) : knit 24 stitches, place marker, knit 24 stitches.
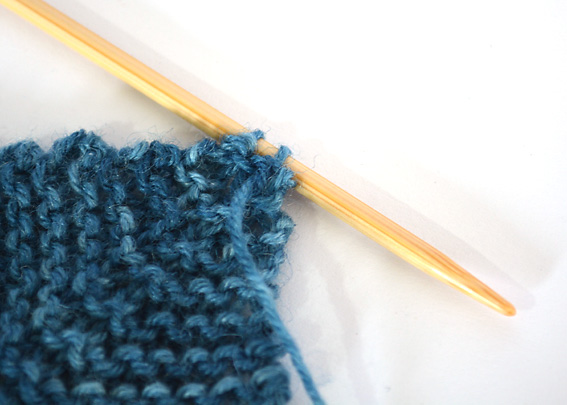
- Row 2 (RS): knit to 2 stitches before the marker, k2tog, slip marker, k2tog, knit to end.
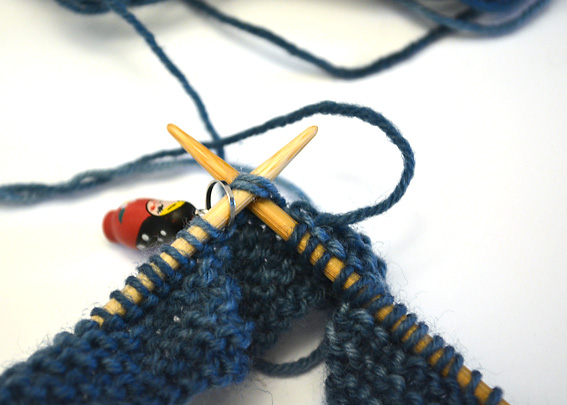
- Row 3 (WS): knit
- Repeat rows 2 and 3 until 2 stitches remain.
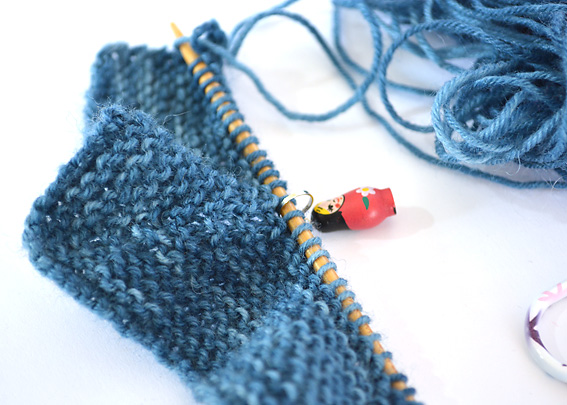
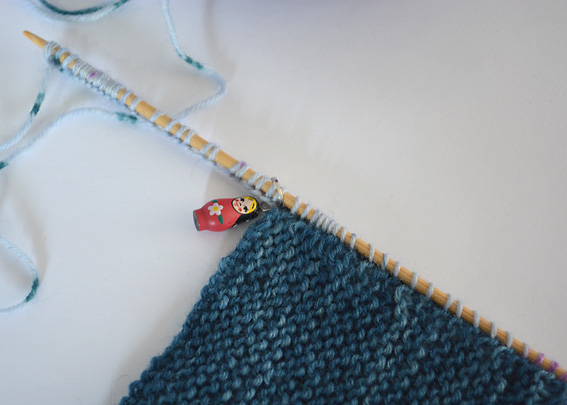
You’ve finished your first mitred square. This is square 1 which is in the bottom right corner of the blanket.
Mitred Square 2:
The joy of knitting the mitred square blanket is that the squares are joined together as you go, so no sewing together of squares and minimal finishing.
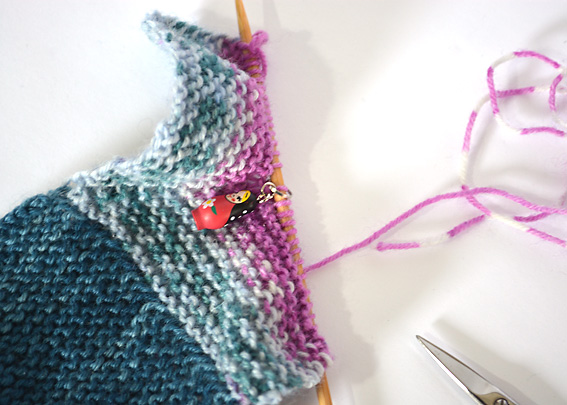
Square 2 will be attached to the left edge of square 1. With the right side of square 1 facing you, knit the 2 stitches remaining on the needle of square 1 using your new sock yarn colour. This is the first stitch. Pick up and knit 23 more stitches along the edge of square 1.
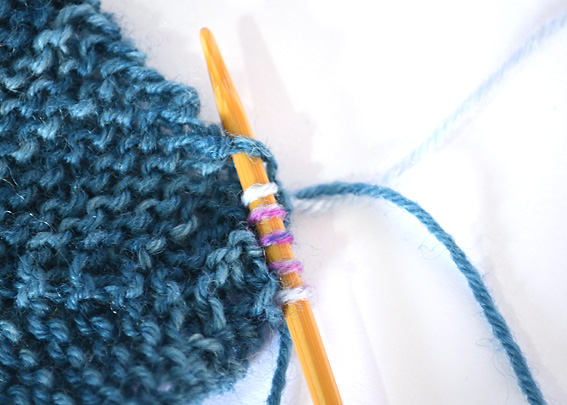
I chose to knit the ends in as I went. Some people may prefer to leave them loose and weave them in later.
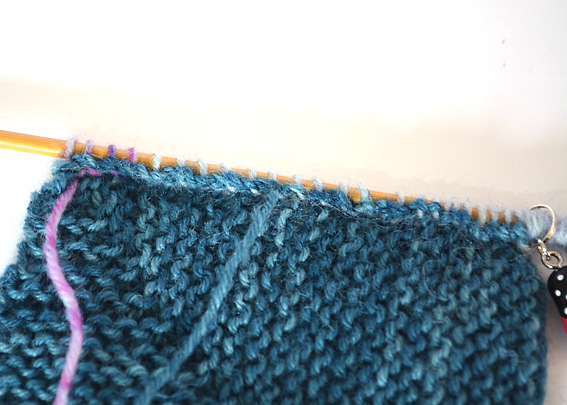
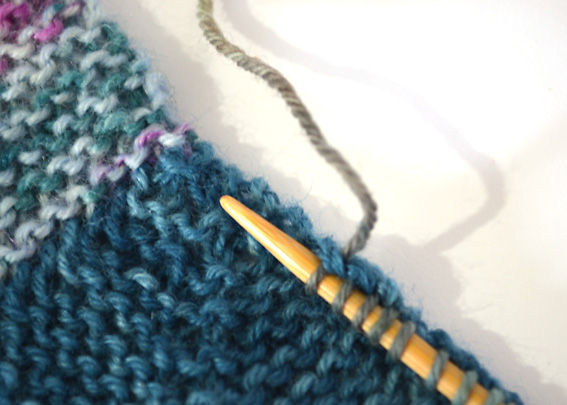
On the first row, as I pick up and knit the stitches (along the edge of each garter stitch ridge) I weave in the yarn end from the previous square, for the first 10 stitches. The photo above shows the wrong side of the square where the yarn end from square 1 has been knitted in along the edge.
When I’m nearing the end of this edge, I count how many stitches I’ve made and how many garter stitch ridges remain, if you have to, you can miss out a ridge to make sure the final stitch is on the corner of the square.
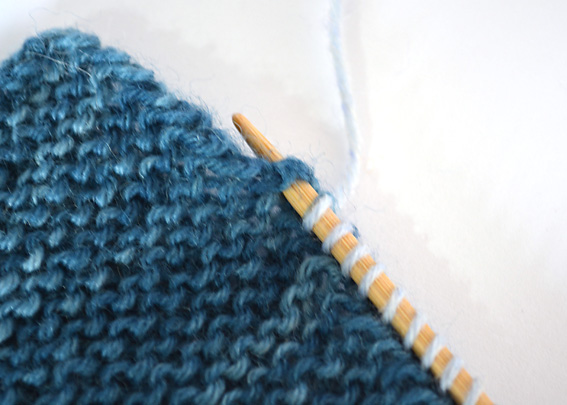
When you have 24 stitches along the edge, place the stitch marker.
Then cast on 24 stitches using the backward loop cast on using your working yarn.
This is the right side of the mitred square blanket.
Turn, and knit one row (wrong side). The second square is knit exactly like square 1 from this point on. Starting with Row 2. Remember to knit in the yarn end for square 2 on this row.
- Row 2 (RS): knit to 2 stitches before the marker, k2tog, slip marker, k2tog, knit to end.
- Row 3 (WS): knit
- Repeat rows 2 and 3 until 2 stitches remain.
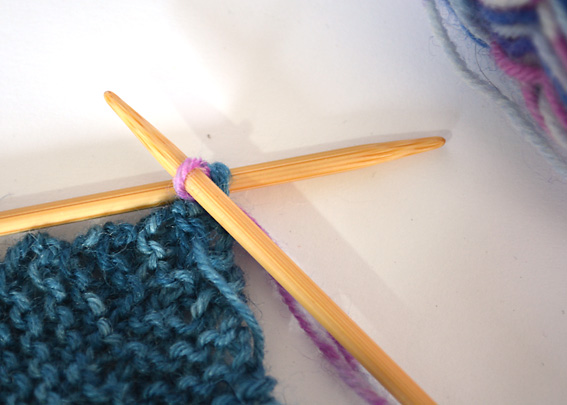
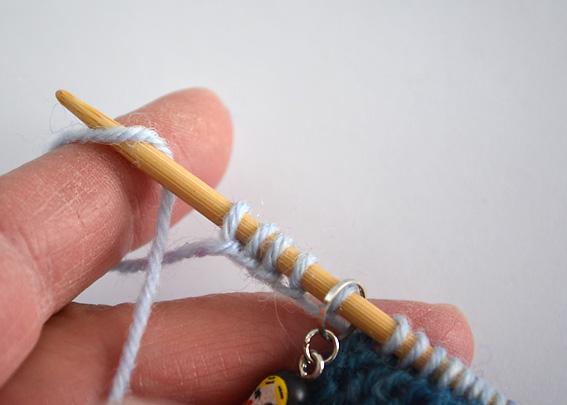
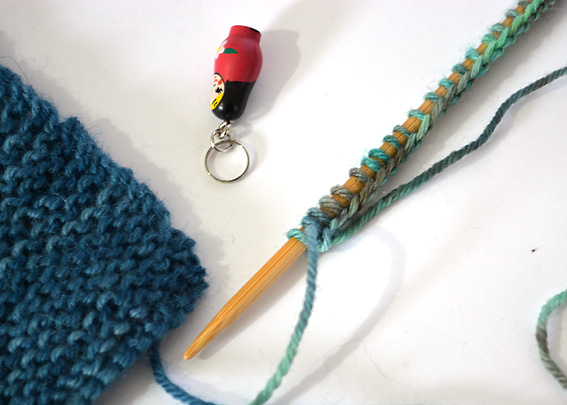
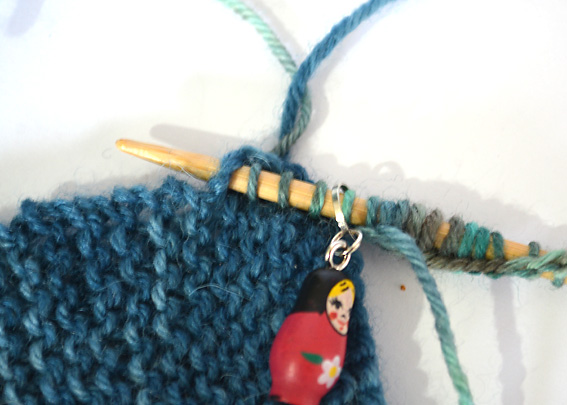
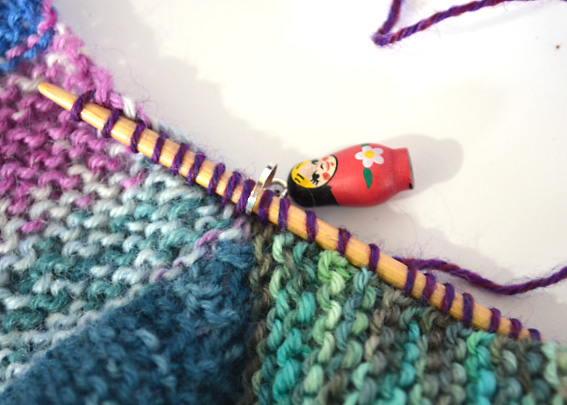
Cut the yarn end about 20cm (8″) long. Place the two stitches on the locking stitch marker or safety pin.
Mitred Square 3:
You are ready to start square 3 which will be attached to the top edge of square 1.
Using sock yarn 3, cast on 24 stitches using the long tail cast on. Then place the stitch marker.
Pick up and knit 24 stitches along the top edge of square 1 through the edge of each garter stitch ridge. Remember to knit in the ends in the same way as for square 2.
As you are nearing the end of the top edge of square 1 remember to count the stitches you have made and how many garter stitch ridges still remain. Try to have the 24th stitch in the ridge beside the joining edge between square 1 and square 2.
Turn, and knit one row (wrong side). Then knit square 3 in the same way as square 2 beginning on Row 2 (the right side).
- Row 2 (RS): knit to 2 stitches before the marker, k2tog, slip marker, k2tog, knit to end.
- Row 3 (WS): knit
- Repeat rows 2 and 3 until 2 stitches remain.
Mitred Square 4:
All internal squares in the mitred square blanket will be knit in the same way as square 4.
Pick up and knit 24 stitches along the left edge of square 3, place the stitch marker, then pick up and knit 23 stitches along the top edge of square 2. When you reach the 2 stitches that were left on the locking stitch marker, knit the 2 stitches together, this is the 24th stitch on the top edge of square 2. Remove the stitch marker.
Turn, and knit one row (wrong side). Then knit square 4 in the same way as square 2 beginning on Row 2 (the right side).
- Row 2 (RS): knit to 2 stitches before the marker, k2tog, slip marker, k2tog, knit to end.
- Row 3 (WS): knit
- Repeat rows 2 and 3 until 2 stitches remain.
The Next Step
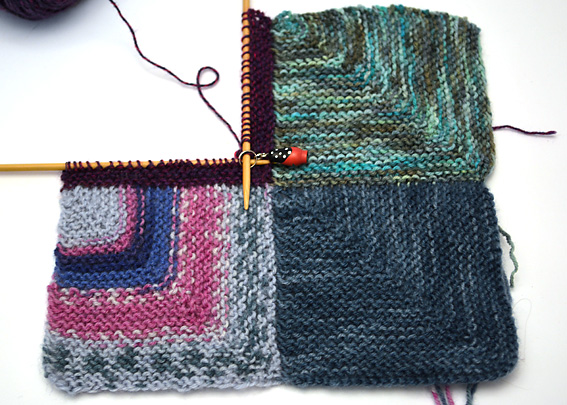
I have become aware that some people knitting the Mitred Square Blanket are not sure how to progress after the first 4 mitred squares are finished. ![]()
This photo shows where the new blocks are added.
![]()
All Mitred Squares number 2 are worked the same and create the bottom edge of the blanket.
All Mitred Squares number 3 are worked the same and create the right hand side edge of the blanket.
These create the ‘skeleton’ of the blanket.
Most of the squares in the blanket are worked the same as the Mitred Square number 4 and fill the centre of the blanket.
I hope this helps you. ![]()
I hope that you found this tutorial for knitting the mitred square blanket to be helpful. If you find any errors, please let me know. I edit and proofread all the patterns and tutorials that I write myself, but I know the odd error may creep in. Anything spotted by eagle eyed readers is always helpful and appreciated!
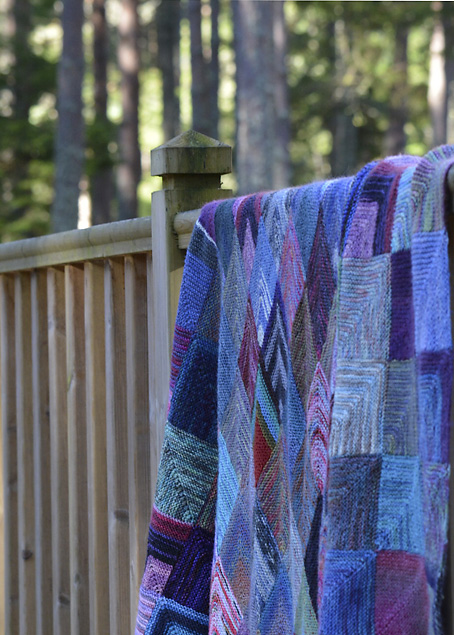
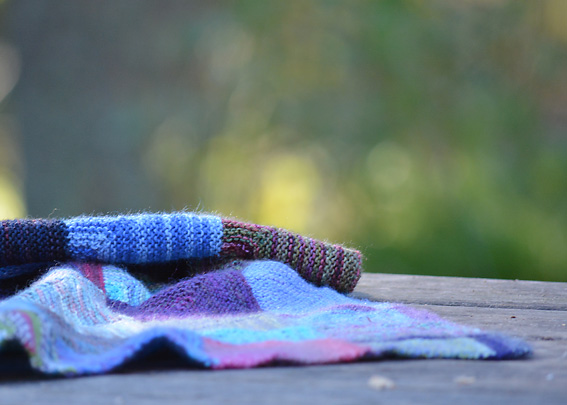
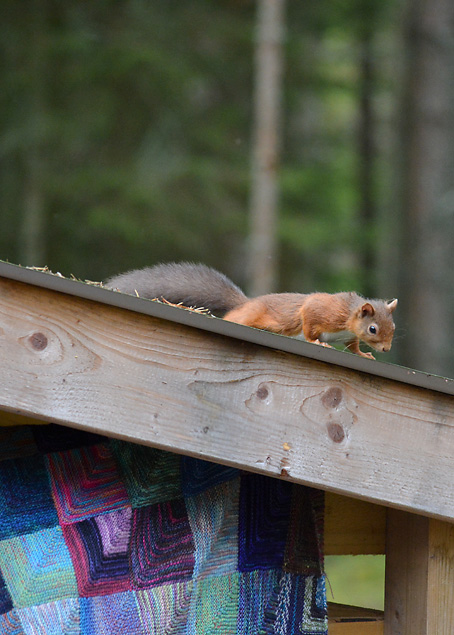
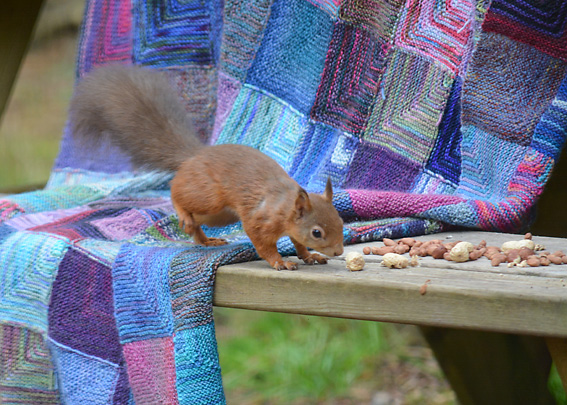
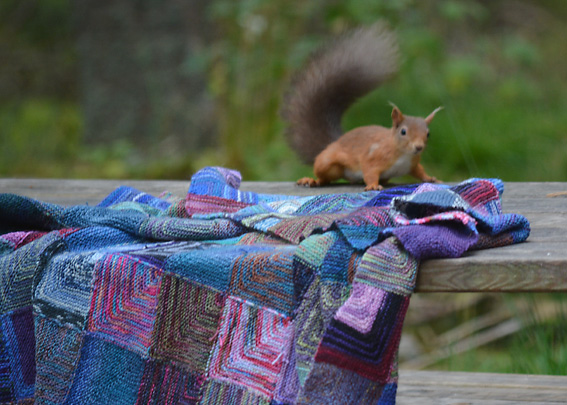
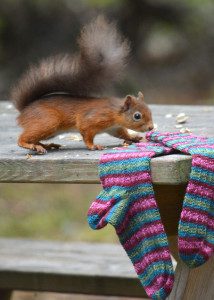
The mitred square blanket was photographed at the lodge that we stayed in for a week in the Cairngorms. This was where we took the photos of the gorgeous and acrobatic red squirrels. We got great photos, they were pleased with their payment of peanuts and hazelnuts that we had brought with us. We brought quite a lot of shelled peanuts and hazelnuts as well as peanuts in their shells with us and used all of them before we left.
This is a nice sized blanket, big enough to snooze underneath on the sofa, or to throw around your shoulders when you are outside.
I chose not to add a border to my blanket. This was partly because I was thinking of making it a little bigger, but actually, I like how the edge looks. I have thought about doing an applied I-cord edging like I did on my mitred square scarf. Still not sure! What do you think?
I love hearing how you enjoy knitting the patterns and look forward to reading your comments here and on our Facebook page.
The Knitting Squirrel now has a Ravelry Group and I’d love you to come and join us. The more the merrier!
Hi, I found your pattern from watching Kate at the last homely house. I want to learn how to make a mitered square blanket and I watched several youtube videos. Then I went to your website to look at your instructions. I think you have the most detailed instructions and photos I could find. Just wanting to know if there is a way I can print out the instructions and photos? Thank you so much for the pattern. Deana
Hi Nicolette. I was just looking at the photograph showing how all the blocks are fitted together, but surely they are the wrong way up? As you look at the image, Square 1 starts with 2 stitches. I found it a bit confusing when I was trying to work out where to go from square 4, but I now realise thate looking at it theother way up, with the 48 stitch foundation row at the bottom rght instead, it makes more sense.
I’ve only just started this projec, and what I like about it the most is that there is no sewing up, and you can just continue working on it until it is the size you want. [I’m not sure why you think that double-ended needles are needed, but maybe I will see why once I am working on it.]
Yes I think you are correct Wendy. If the photo above with the numbered squares is rotated 180 degrees it correctly shows the mitred squares as they should be. The only issue then is that the numbering is wrong. Any chance of a new photo Nicolette? Otherwise I’ve found it very easy to follow. I guess after square 4 it’s just a matter of deciding where to start your next square (personal choice) and using the technique for either Square 3 for the right edge. Square 2 for the bottom edge. And square 4 for all internals. It’s only square 1 that never needs repeating.
Hello Nicolette,
I was delighted to find your website and this pattern especially as it’s a technique for knitting squares I’ve puzzled over for a long time. I’ve begun making a blanket, using various undyed DK British yarn, but find that a couple of my balls are 4ply rather than DK. As it’s a finer yarn, would you suggest I cast on extra stitches, to match the size of the DK squares?
Many thanks,
Kate
If most of your yarn is DK, then when using the 4ply yarn, hold two strands of 4ply together at the same time. That way it will be the same as the DK weight yarn.
I want to ask commenters to of apply the diagnosis of OCD to themselves. If they have not been diagnosed by a doctor they are taking a very serious medical term and applying it to themselves. This is not fair to those whose mental health has truly required behavioral training and perhaps medications that will. EDF to be taken or many years. Throwing around terms are wrong when it fully understood. Find the correct word to describe how you feel/act
Hello from the US, thank you so much for this tutorial on mitered squares.
I am trying to adapt your method to knitting the Hue Shift Afghan and am having trouble figuring out how to pick up stitches for the third square which is a two color stripe.
I am not slipping my end stitches, merely bringing my second color over the first color when beginning a new row as recommended by Snufflebean Yarn in her two color mitered square tutorial.
Where would you recommend picking up stitches? Picking up from the back produces a trough on the right side which I worry might stretch out a bit over time.
https://youtu.be/CLUe7IPCwOw?si=S2BiZa-Nve99sF_v
Hi,
Here is a video that can help you out. I found it very helpful.
Hope that I could help you.
Lots of love, ka de slang
Hi Nicholette,
Finding your blog post on the Mitered Square Blanket was a an answer to a question I had had for a time. I have the Vogue Knitting – The Ulimate Knitting Book in my library. I wanted to expand my knitting skills into entrelac knitting because of a beautiful scarf I found – and came across Mitered Square knitting. I tried the instruction in the book and it didn’t quite turn out. And then finally I found The Last Homely House YouTube Channel and she recommended your blog tutorial for the Mitered Square Blanket – she used your post to learn. I am so grateful I found this instruction because I am enjoying knitting The Mitered Square Blanket. I have just started and I’m on Square two – and I skipped ahead to read what is next and I understand how it all comes together. It’s exciting! Thank you so much for sharing this,
Lori Hanson
Muchas aún no lo hago creo que las explicaciones son claritas muchas gracias!!!! Me encanta probar cosas nuevas
Cont…., Of course I can make it longer but also need it wider. Do I just have to make another one?
Hi there. I am really enjoying knitting your blanket. However now that I am about 1/2 way through I would like to make it bigger. Is there any way now to add on the squares somehow. Otherwise this will be just a small lap blanket.
Just continue adding squares as you have up to this point. You can measure the squares you have already knit to see how many more you will need to obtain the size of blanket that you want.
I have read your tutorial, and although everyone says it’s easy once you get into the swing of it, it looks very daunting to me as a novice knitter.
Do you have a video on you tube please?
I think I’d find that easier to learn from.
Gentle Blessings
Jacquelyn
No, sorry, I don’t have a youtube video. I’ve not attempted filming anything.
Could you please tell me what the purple and red yarn is, in the square 4 picture above the picture where you say what kind of square each is?
thank you
I use scraps from my leftovers box and often the labels are gone so I cannot name the yarns in the various mitred squares.
Did you find that you needed to block this?
No, I didn’t need to block it, although, I did give it a wash and spin dry as I felt it needed freshening up by the time I’d finished knitting it.
I LOVE this pattern and have it in several versions. Yours is by far the easiest. However I am in a quandary. I am a left-handed knitter and I’m having trouble adding/joining the squares. Any suggestions?
Hello Karen-
I too am a lefty knitter and can’t seem to get my head around adding squares in the right orientation. Were you able to find any help to get you over this hump?
Muchas gracias por compartir como hacer la manta.
Está muy bien explicado.
Ya la estoy haciendo y está quedando muy bonita
Cariños
Gracias por tu lindo comentario. Estoy encantado de que estés disfrutando tejiendo la manta de cuadrados mitred. Espero que te guste tu manta terminada.
Hello Nicolette,
I have found your method very easy to follow. I would like to make one comment though. Knitters do not need to use DPNs.
I have made all 4 varieties of square on single-point needles without any problems!
At first all I could find in my (extensive) needle collection was a set of 4 DPNs, but only 7” size… I used two of these and had to keep the stitches from falling off the ends with elastic bands on the needle ends. Also, as they were metal and too slippery I broke down and went to my LYS to buy a pair of 9” straights, in bamboo. Much better!
Funny, because in my usual knitting I use circulars, even for flat knitting.
Now I have a question for you.
Once our COVID-19 restrictions are lifted (in Canada, Calgary Alberta) I will resume teaching some classes at the aforementioned LYS. With your permission I would like to work up a class on this very project. I would absolutely give you full credit, but will not do it if you would rather I did not. Please let me know!
Thanks for your consideration.
Sincerely, Fran Snider
Hi Fran, I’m delighted you enjoy knitting the blanket. It is great to know that straight needles work well for knitting it. I also have an extensive collection of needles but don’t actually have any straight needles in it as I normally use DPNs and circular needles. I think it depends upon what you find most comfortable for working with. Best wishes, Nicolette
Hi
I’d love to start your blanket – I’m a novice
I’d like to make the squares separately as I don’t have all the yarn to start with, and want to mix up the colours as I collect yarn
Are they easy to stitch together -and what stitch would you use?
Thanks
You could sew the squares together, but, it would be a very long and tedious task to do. You’d enjoy the project a lot more if you keep a note of where the pattern instructions are and take a while to collect the yarn you’d like to use. It might also be an idea to try a yarn swap with knitting friends. I spent about a year collecting up my leftover sock yarn that I wanted to use in my mitred square blanket. I kept it in a box until I was ready to use it.
The blanket is very srighr forward and I have been knitting for 40 yrs but am unable to get finished squars in the correct order when beginning a new square and I’m unclear about which side is right is front and back. Is it the side where the decreases are? Appreciate reply.
Hi, I used a removable stitch maker to mark the right side while knitting the first square. This helped me!
Thank you for your lovely clear instructions. I’m just starting a blanket. Lots of fun ahead!
Enjoy!
I started my blanket last April at the beginning of lockdown after reading your article. It is such a simple but beautiful project that I return to between more complex knitting pieces. It’s now the same size as yours, but as it brings me such joy, I’m going to keep going for a while longer. My plan is to take it with me on our annual trip to Green Man Festival here in South Wales whenever lockdown ends, and wrap it around whoever needs it most.
Thank you for inspiring me.
Wonderful
Hi if someone can help me please as I cannot find a response in other questions here.
Square 1 .. the remaining 2 stitches. Do you knit them as singles stitches to start the next 24 stitches on the left side? This does not appear to be clear in the instructions.
Many thanks
Yes, the remaining 2 stitches are knit with the new coloured yarn and becomes the first stitch.
I’m still not finding it clear about the last two stitches –
are they knitted seperately or knit two together ?
Someone has stated that the last two stitches become the first stitch of the next square which implies they are knitted together, but it is also stated that they are knitted seperately – which is it please ?
Hello Jeannie, The last two stitches are knit two together using the new yarn colour. Then you continue with the new colour picking up and knitting the stitches along the edge of the square. Happy Knitting, Nicolette
Thank you.
I got confused with the instructions too after the first square because it didn’t say knit two together on the last 2 stitches, but from the photo I assume you must, and then I found this answer which explains. Thanks.
Hi I am a newbie COVID knitter 😂 I have read the responses but don’t seem to find an answer, if someone could help please? 2 stitches end of square 1, do you…
(A) knit them as single stitches to start square 2..
(B) knit one and keep the other on a holder for another square…
(C) knit them both together..
(D) other… please explain if you don’t mind.
Thank you I would so appreciate the help. Knitting to surprise my hippy earthy pregnant daughter for her soon to be born baby. Definitely be a big surprise if I manage it too haha .
I just love the look and pattern, it’s perfect 🙂
Hi there
I have just been lead to your amazing pattern. Thank you.
I do however need to ask, do you knit the blocks in order 1,2,3 &4 then again 1,2,3,4 etc or do you do the borders first and then fill in the middle
THANK YOU for these details, It is an easy knit, but the bit of reassurance this helped quite a lot!
Thank you Nicolette, I was stuck after the 5th square! I have always wanted to try one of these and now that I have the time I started. Using wostered wt. leftover from various throws etc.
Very comprehensive instructions.
Jill
Hi Nicolette! Found your site today whilst trying to find some help with some instructions in a knitting pattern for a child’s blanket that I bought recently. Your explanation and photographs were extremely helpful in helping me to grasp what I was misunderstanding in the knitting pattern. I have now completed two mitred squares; only 61 and all the edging left to do! Wish me luck and many thanks again. Looking forward to dipping into your lovely articles and ideas in the future. You have been bookmarked and subscribed to 🙂
Thank Goodness I found your webpage…best instructions ever and I had looked at quite a few. My first time trying a mitred square blanket and managed to attach 2 squares, then I was stuck and about to give up.
You made things so easy to follow and I thank you for sharing your patterns and insight..successfully attached square #3 on top and I’ll continue with this project.
Thanks again…wonderful webpage with easy to follow instructions and pictures…
Thank you Pat, so glad you are enjoying knitting your mitred square blanket. Nicolette
Thank you for an easy to follow and easy to adapt pattern! I actually have 2 of these blankets in progress. One in a bunch of random sock yarns I picked up and another I’m doing with leftover skeins of worsted weight. This is such a fantastic pattern! With the worsted weight, I’m using bamboo 5.5mm single point needles and 6 blocks by 6 blocks is the perfect size for a baby blanket, in case anyone was wondering. 🙂
It is fun knitting these mitred squares and choosing the next colour you want to add. I’m always trying to find new ways to use up my leftover sock yarns.
Am I talking to the Squirrel? I am on Ravelry too (Oceanwide) and in this self quarantine time (I am in Seattle ),
I have been trying to work out how to make a mitered square so I can knit a blanket with various leftover Yarns. I have one started,using worsted variegated yarn : slip 2,k1 , pass 2 over.
But I don’t like the look. Yours is lovely: sl1, K1?or sl1? Pass each over separately ? Then knit on! Thank you.
Susan Gillespie
Thank you Susan, I’m so glad you are enjoying knitting the mitred square blanket! Nicolette
I have written you another post in which Iasked why you are using sock (or lighter weight) yarn instead of worsted. I know you sell sock yarn. Or is there another reason? Also, as I look at other mitred squares on Pinterest, I see that some have a raised knit stitch up the center of the mitre-is that done by k2 together just at the center stitch and if so, do you have to have an odd number of stitches on each edge? Finally, lots of other illustrations of this block use two needles,breaking the square onto two needles.Iam using one needle with a contrast yarn at the turning mitre. Does this affect the look?I find it easier!
Hi Susan,
I don’t use worsted weight yarn because I live in the UK and worsted weight yarn is not readily available here. I’ve a large collection of sock yarn, 4ply yarn and 2ply wool and some DK weight yarn because that is the weight of yarn I like to knit with and have collected over the last 20+ years. It really is a matter of personal preference. Many of the projects that I knit and write about on the Knitting Squirrel blog are not made using yarn that I sell and are made from yarn that I have in my collection. When I knit a project that requires a heavier weight yarn, I normally have to buy the yarn I need, specifically for that project.
After knitting lots of different mitred squares, I preferred the look of the mitred squares that didn’t have a diagonal spine stitch running across the square. There are many other explanations on how to knit mitred squares that feature a centre stitch. I would expect that they have an odd number of stitches so that the two sides of the square have an even number of stitches and the extra stitch becomes the centre stitch.
I use 2 double pointed needles for knitting my mitred squares because they are the needles that I use for most projects if I’m not using a circular needle. In the same way, I use wooden and bamboo needles because I find them easiest on my hands as I have carpel tunnel and a long running hand injury and I like that the stitches don’t slip off the needles easily. Knitting is very flexible so I wouldn’t expect that using one straight needle with a contrast yarn stitch marker would adversely affect the look of your finished square.
Using 2 needles for knitting the mitred square means that I don’t need to use a stitch marker for the centre point of the square and I can easily count the stitches on each needle to check that I haven’t made any errors. However, initially, I do need to keep an eye on which is the right side and which is the wrong side of the square. After a few of the squares have been made and as the blanket grows the right and wrong sides become obvious.
I’m sure your worsted version of the mitred squares blanket will be beautiful. When I’m knitting a blanket I tend to opt for a looser gauge than I’d use for knitting a sweater but tighter than I use for a shawl as I want the finished blanket to have some drape but I also want it to be durable. The only way of finding what you like is to knit a few different squares and see which finished fabric you like the best. My first mitred squares were weighed so I could see an average weight of yarn needed for each square and I unravelled a couple of them and measured the yarn so I had an idea of how much yarn was needed to knit each square.
The final reason, I like using sock yarn for knitting my blankets, is that they are machine washable. I usually wash them on the wool cycle, and then spin dry to remove any excess water. My blanket will not shrink or felt during use.
I hope this has been helpful to you. Happy knitting, Nicolette
I have lots of sock yarns after using your wonderful tutorial for making socks. I am definitely going to try this. I did a mitered square blanket that the pattern called for slip 2 knit 1, pass 2 sts over and I’m not crazy about the ridge it created so I think this will be wonderful. Will also be fun to see how all of the sock yarns come together. Thanks so much for great tutorials. Your sock tutorial is perfect.
There are so many different ways of doing the mitred squares. My method is just one of them. I hope you enjoy knitting your blanket.
Dear Nicolette,
Thanks so much for this pattern. Very thorough instructions. I have an addiction to beautiful Socks yarns. Unfortunately only have two feet! 🤣. This pattern is excellent for putting them to use. Also, have been able to use up small scraps as each square only seems to use about 15 yards. Would love to see more of your patterns!
Karlene
Thank you Karlene, I’m delighted you are enjoying knitting the blanket. I also use up short pieces of yarn as if I run out of a colour part way through a square I just add another sock yarn to finish the square. Knitting the mitred squares is fun. Nicolette
Hi Nicolette,
I have a Kilo of wool I actually don’t know what to do with – such a blanket seems to be the perfect project for it.
I wonder if the ‘4’ squares can be made with a circular needle as well?
Unfortunately, I don’t have double pin needles…
Thanks!
Sorry, of course I meant double pointed needles…
Hi Ines, I’ve never tried knitting a mitred square using a circular needle. I don’t know if it is possible. You could use straight needles if you don’t have double pointed needles. Maybe, another reader here could say if they have used a circular needle for this? Nicolette
I have used a circular needle to knit this pattern and it works wonderfully!
I am using a circular needle in a smaller size for casting on and knitting the first row. This keeps the edge nice, then I continue on straight needles!
Hi Nicolette,
Thank you very much for this pattern. I’m just loving it.
I have one question. At the end of the first square 3, there are two stitches left on the stitch marker. At the beginning of square 4, should I knit together those two stitches as the first stitch of square 4? Or leave them on a stitch marker?
Thank you so much, Patrick
I am reading this in 2023. It is such an excellent set of instructions. Thank you so very much. Our local yarn shop, which has been an excellent one for 30 years, is closing for good tomorrow. Oh I am heartbroken. From now on you and others like you will be my lifeline when confused. I hope that you will still be right here at my fingertips. Again, thank you for this wonderful project and your superb instructions. The comments helped too!
I am 9 squares away from finishing my blanket!
It’s a much sort after project in my home with several family members wanting it –
BUT IT’S MINE!!!!
I loved knitting it and will probably make another.
Congratulations Natalie 🙂
Hi l have been looking to see how to knit like this for years, thanks. But l cant see why instead of using a marker.. besides l dont have a darling like yours….why not cast on 25 plus 24 and use 25st as slip stitch…so much easier to follow than a marker l think.
Hi, You mention the i cord as a possible edging . I intend using one to link my (regular not mitred) squares as well as edging but am less sure how to manage the cross paths. So I mean the I can join (any) two columns of squares with an cord but what to do with the “rungs” that are needed between each square in the column? Just do short i cords and fudge the “crossing” or leave the C/On and c/off edge sts of each rung to be picked up by the travelling vertical icord? I just cannot visualise it. as in the main the sts for all squares will be like the terracotta army, all facing the same way. I suppose I could do a three row matching colour link between the c/o an c/o edges but I am perplexed! Any ideas?
(I have been motoring but chose not to join the cumulative mode as the point of the work was having little things to carry on long travels on planes so each square was stuffed in a coin bag or down a shoe or suchlike. When I use them in future to make a garment it will be important for stretch issues to work together as i go. They do tend to drop depending on wool weight, but you can do a bit of both and have some pointing up and some down for example to balance that aspect. try it! Thanks for your work. M
I have one in progress but do not like that it is not completely “reversible”. There is a definite wrong side. I wonder if there is any way to pick up the stitches that doesn’t leave a visible ridge on the wrong side?
IF you work a slip-stitch selvedge (sl first st knitwise/purl last st OR sl first st purlwise/knit last st), and then only pick up in the back loop of each ‘chain’, the transition between squares is imperceptible to touch. Have a look at my mitred squares: https://www.ravelry.com/projects/JessicaJean?set=mitered-squares&view=thumbnail
Your instructions worked well for me, thank you. I am really really enjoying making it. It is a little addictive- almost as addictive as the socks from which leftovers I am knitting.
Thank you very much for the comprehensive directions. I especially appreciate the great photos you included. Can you please help me with the directions at the beginning of square 2? With my new yarn am I going into my square 1 last two stitches and making one stitch? I am at that stage now and at just knit both stitches but then I will have 25 stitches if I pick up 23.
The final diagram you added with 16 blocks is really helpful, but is labeled backwards which had me scratching my head for a bit. Block 1 is in fact the upper-left-most block, and then Block 2 is to its right and Block 3 is below it. The blanket grows down and to the right Either the labels or the photo need to be rotated 180 degrees to match the block numbering you’re using above.
Thanks for this detailed tutorial with great photos and minimal end-weaving. It’s the most helpful one I’ve seen out there!
No!
It makes perfect sense if block 1 is at the bottom right, & you work block 2s along to the left, blocks 3 upwards, & blocks 4 fill in the spaces between…..that’s how I’m doing it….
No renumbering or rotating needed at all.
Thanks for the tutorial…..loving the process
Xxx
This had me scratching my head too. I stared at the picture for ages before I realised it was upside down and the wrong square labeled as square 1. I think the blanket picture needs to be spun 180 degrees. The bottom right square (square 1) should have a long cast on edge, not the short finished tip.
I have looked at the image in the post. I start from the bottom right corner when knitting the blanket and that is what the image shows.
Hi. Great tutorial for the mitred square blanket and the photos were a great help. Thank you
I really would love to make this blanket, but what do I do after I have knit the fourth square? Thanks, Heidi
Thanks for the tutorial of the mitred sqr. I have worked the 4th square and I shall try to send a pic, you have really explained it well, what to do after the 4th sqr now
What is sock wool? Is it like the English 4ply knitting wool or yarn?
Sock wool/yarn is similar to the UK 4ply in weight although you can also buy 6ply and 8ply versions that are DK weight. Most sock yarn has some nylon in it to give the yarn more strength for wear and tear. There are many variations of sock yarn from commercial printed ones to colourful hand dyed ones. A lot of choice. Most sock yarns come in 100g balls and most people have small quantities of sock yarn left over when they knit socks, hence the rise in popularity of projects that use up the leftover sock yarn.
you made a lovely blanket
Hi Nicolette, I love the colors in your blanket, and have often thought of using an analagous color scheme myself but not sure how it would turn out. I think the fact that you are willing to be a little relaxed about adding in the occasional odd color is what gives your blanket that bit of spark that makes it so appealing. Thanks for your inspiration. One day i hope to get started on a worsted weight one as I don’t knit socks nor can I handle such small needles these days. Just hope it won’t be too heavy. Will see what some Ravelers will have to say.
I am wondering if a step is skipped in the instructions. If you cast on 48 stitches, then put the place marker at 24 for the first 3 steps, when you start those steps over do you put the place marker at 20 stitches, then 16, etc?
I think it could help to think of it as putting the marker between the two sets of 24 stitches initially. This shows you where to Knit 2 together before the marker, then slide the marker, and repeat knitting 2 together after (then finish out that row by knitting the rest of it). Next row is knit. Follow these two row instructions until you are down to the corner of your little square.
Another way to think of it is that you start out with twice the length on row one. And in the process of knitting 2 together during decrease rows before and after the marker (every other row) you are bending two sides of the square into triangles to shape your square.
Hi Nicollette.
Just started this blanket. Could you please take me beyond square 4? Maybe a diagram or the basic pattern throughout. Sorry to be a bother. Thank you so much for this beautiful project and helping me.
Thank you for a wonderful tutorial. I have just one question (I haven’t started on this blanket yet): why is it necessary to use double ended needles? I hope this isn’t a silly question but I shall have to buy them. Lisa
I knitted mine with regular needles – but I did find it easier to pick up stitches on the edges using double pointed ones.
You could use a kebab sticks/skewers as a alternative, rather than purchasing ones you may not need. – I have previously!!
Gracias por el tutorial, me encanta poder hacer la manta así para no tener que hacer costuras después.
Thank you Malores, It is so much easier not having to sew seams. Nicolette
can you use any yarn i only have homespun wool
I have used all sorts of yarn. The only thing to remember is use the same type. So the whole blanket in Aran, or chunky or even 2ply. The only thing that changes will be the size of the individual blocks.
Hi Nicolette
I’ve just found your tutorial for jayg mitred sq blanket. I’ve been knitting mitred squares for a while now and intended to join them when I have enough for a blanket, I didn’t want to jayg because I’m so ocd about colour placement and because I hadn’t found a jayg pattern I liked, but yours is lovely and neat so I decided to bite the bullet and have a go, I’ve done three squares so far and love it, gonna let go of my ocd and just have fun with no sewing up to do. So thank you very much for sharing this tutorial.
Love and best wishes
Jill 😊
Thank you Jill.
OCD is horrible Jill Cooper. This would be a great project for you to kick it in the teeth!! Pick out your yarns at random don’t think too much about if they go or not, they will go together. This blanket is perfect for that. We’ll doneNicolette.
Help please. I found your tutorial excellent for the first 4 squares but I don’t know how to continue. Please could you explain where I go next.
Thank you.
love your blanket do you have a book to buy with you pattern in it ? thank you betty
Hi Betty, I haven’t written a pattern for the blanket. Only the tutorial post. Best wishes, Nicolette
I love your Mitred Square blanket and the colors you used. I don’t do socks but I plan on making myself a Mitred Square blanket just for the pure love of it. It looks so comfortable and I understand you liking the feel of it on your lap as it grows larger. I have several projects already planned but I am going to get some sock yarn and the bamboo needles you suggested using and start on the blanket. I think I will put a border on mine. I like quilts that have borders and think I will feel it has a more finished look by adding a border. I want to use a lot of blues to purples into the pinks and a few of the other colors in mine and I can see it with a “warm” navy border. Thank you for a great tutorial. I have seen photographs of a Mitred Square blanket and thought I could never make one like that. I am not a real fast knitter either, I knit for the enjoyment of it not the speed. I love the little red squirrel, I have bunnies in my yard at the moment. Mama has at least 2 tiny babies now. The squirrel will arrive later when the nuts from my hickory nut tree are ready to be picked. They get all of the nuts and I love watching them bury them in the yard and then come back to get them in the Winter.
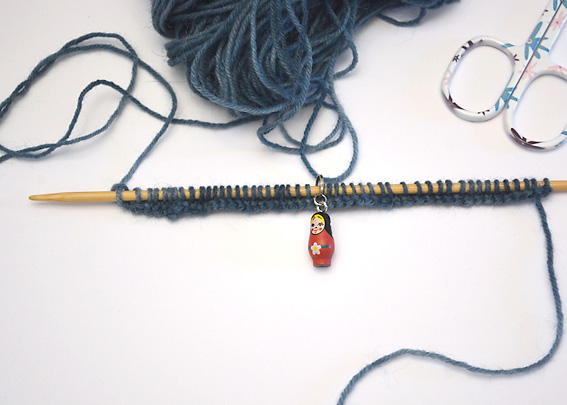
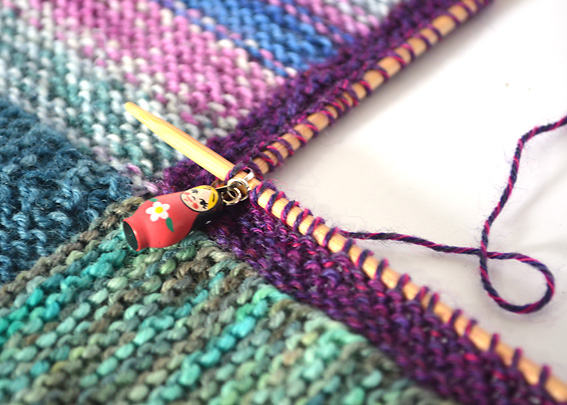
Love your tutorial!! I have to say, I’m obsessed with your Matryoshka doll stitch marker shown in your photos here. Where did you find that?? 🙂 <3
Thank you, so much for your great tutorial. I’ve done some domino knitting in the past. Printed tutorials are my favorite. I love your detailed steps with all the pictures. I like your method of leaving the last 2 stitches on the current square to join with the new square. This results in a better/stronger “anchor” to the prior square. I use worsted weight yarn with a Size 10 (USA) needle-but am trying smaller needle sizes.
I am thinking of doing this with new yarn, not scraps. What would be the yardage I’d need to finish, I’ll be using 2 colors
My finished mitred squares blanket weighs approximately 770 grams. If you were using 100g balls of sock yarn you’d need 8 balls, but you could need more if you wanted to knit a larger blanket or to add a border on your blanket.
Hello Nicolette and thank you for making so many photos so the tutorial is so clear. So often what we read and understand is different than what the tutor has written and means. You showed so clearly where to put the needle. Thank you so much.
I’m pleased you found the tutorial helpful. Hope you’re enjoying knitting your blanket! Nicolette
Thnaks for this – Was so much fun to knit. I used Sirdar Big Softie on 12mm needles. I cast on 24 stitches at the start which kept the squares of a manageable size. I used just under 38 balls and took about 1 month.
The 2 stitches left at the end of square 4 I simply put on a holder then used as 1 stitch of the next square.
Sounds like it will be a wonderfully soft blanket. What a great idea.
Thank you for sharing your tutorial. I have outlined my squares in black when I was picking up the stitches. It defines the hundreds of sock yarns used. I intended it as a waistcoat for my daughter but being so addictive it has grown into a large single blanket. I researched doing an I chord edge but shied against it -too much a labour of love! I I am now planning a dc edge with a shell finish
Your blanket sounds gorgeous. I know what you mean about the I cord edge. I used it around my mitred square scarf. Your crochet edge sounds perfect.
Hi, I am in the middle of trying this for the first time. I have just started square 3, by the looks of things this will leave another 2 stitches left on a stitch holder at the top left hand corner of the square. In your description of picking up stitches you do not mention using these two stitches on the stitch holder. Am I correct or am I missing something? Should these two stitches be included in the original 24 picked up at the start of square four or just left?
I’m sorry I can’t really help at the moment as I’m not at home. If you look in the previous comments on How to Knit a Mitred Square Blanket you may see a similar question answered or maybe someone else will be kind enough to pop an answer into the comments. I haven’t got anything with me in hospital other than a sock to knit on.
Could the mitred blanket be knit in chunky wool
I don’t see why not. I’d probably knit a practice square to see how many stitches you want to cast on, needle size, etc. You wouldn’t want too tight a guage as you want the blanket to drape nicely but it would be wonderfully warm and cosy when it is finished. May knit up a little quicker too. I think I’d probably knit larger squares rather than small ones as that would look nicer in the chunky wool.
Thank you for this tutorial! Looks like easypeasy, but then again, I have not tried it yet.
I am sorry for my bad english. I am from Finland and I don’t remember every word I learned in school, some 20 years ago… Anyhow, this blanket I will make.
Great. I hope you enjoy knitting the blanket. I’d love to see a photo of yours as you work on it. If you’re on Instagram please let me know and I’ll have a look.
Can you please add a pattern, so I can print it out and refer to it when I need to? I cant keep scrolling down the whole thing. Thanks
Sorry, I can’t do this at the moment. I’ll think about it for the future.
I’ve been wanting to knit a mitered square scarf. It’s been frustrating running into YouTube videos only showing the technique and not the whole process from beginning to end. I’m so happy you put the photos of the joining stitches part. Will start a scarf using these instructions!
Hi Mo
Thank you. I used the same mitred square technique for knitting my Mitred Square Scarf. The main difference was that I used different sized squares. It makes a beautiful scarf. I’m sure you’ll love your scarf when you finish it. I’m so pleased you found the instructions helpful. Happy Knitting, Nicolette
Hello Nicolette,
Your blanket has been an inspiration for me. My leftover sock wool has now morphed into half a blanket and is still growing.
When you pick up stitches along an edge (sock or mitre square) do you slip the needle under the two threads between ‘bumps’ to make a stitch or slip the needle under one? I’ve never been too sure on this.
Thank you for your terrific tutorial.
Hi Penny
It is a lot of fun knitting the blanket. At the moment I’m knitting two cushions for my mother-in-law for Christmas using the mitred squares.
There is a single ‘bar’ between the bumps created by the end of the garter stitch ridge. The bump looks a bit like two pieces of yarn tied or twisted together on the edge. I put the tip of my needle beneath the twisted section of the bump so it goes underneath both of these twisted yarns.
I found that if I made the stitch using the single bar that on if I didn’t knit through the back loop on the next row I would have little gaps. Even with that I wasn’t as neat as going through the little bump.
I’m so pleased you’ve enjoyed the tutorial. I’d love to see a photo of your blanket.
I’ll put photographs of the cushions I’m knitting on the Knitting Squirrel when they are finished. Best wishes, Nicolette
Wow! What a fantastic tutorial! I’m working on two Sock Yarn Blankies and am knitting mine very similarly to yours. I’m just using different cast on numbers. And I finish off the square before picking up for the next one. Oh and I always skip the first stitch with the yarn in the front and knit through the back loop of the last stitch. That just gives an easier edge for picking up the stitches.
Anyhow, I really love this post and will be sharing it with my group on Facebook. I also have a group on Ravelry called Sock Yarn Swappers. I post lots of different swapless swaps there. You simply sign up for the dyers you are interested in, pay the fee, and then I make & send you the minis. It’s a great way to build your mini skein stash. I feature a lot of great dyers every month but spots fill up quick. I’d love for you to check it out!
Hi Lisa, thanks for the information about your Facebook and Ravelry groups. They sound like a wonderful way of obtaining lots of different sock yarns for knitting the blanket. I like your suggestion for the first and last stitch. I must try that the next time I’m knitting mitred squares. Many thanks, Nicolette
I have been looking for help with making a mitred squared blanket…… Every time I think I found one its a picture ugh such a pain when you are so interested in something you can’t find…….. Thank you so much for your tutorial……. Please keep posting tutorials they are great help……..
So pleased you found the tutorial for making the mitred square blanket helpful. What colours are you using? I must cast on for a new blanket soon, I love having a long term project on the go! Happy blanket knitting, Nicolette
Hello Knitting Squirrel…..I love these mitred squares. I have managed to do four in a square. I am a novice knitter, so now I’m not sure which square to knit next! 🤔🤔🤔
Hi Hilary,
That is great – congratulations on knitting your first four squares. You pretty much know how to continue. Once you’ve knit another couple they’ll become second nature!
All the squares along the lower edge of your blanket, to the left of corner square 1 and square 2, are worked in the same way as square 2. I knit eleven of these including square 1.
All the squares on the right hand edge of the blanket (above square 1) are worked in the same way as square 3. I knit fifteen of these including square 1.
All the squares in the centre of the blanket (other than the lower edge and the right hand edge) are knit in the same way as square 4. My finished blanket had a total of 165 squares.
There are different ways of knitting your blanket. I liked to keep it relatively rectangular in shape. So I would do a couple more Square 2’s, then, I’d do a couple more square 4’s above them. Then I’d do a couple more Square 3’s along the right edge, then I’d work more square 4’s to turn it back into a rectangular shape again.
Once you’ve finished another few squares, you’ll get into the rhythm of knitting the blanket. It is very relaxing.
I just made sure that the next yarn I chose wasn’t within 2 squares of it in any direction.
Doing it that way, I was able to measure the blanket, every so often to see if it was about the size that I wanted it to be.
I hope that helps. Happy Blanket Knitting, Nicolette
Hello again Nicollette.
Thank you so much for your very full reply. I have now made nine squares in all! I am such a beginner. Your squares look so perfectly square and mine are a little more shall we say rustic😊 I was originally just going to knit one square just to see if I could. It looks as if I am now doing a blanket. My friend gave me some of her sock yarn ends( I don’t know how to knit socks yet) and I have bought some tiny 10g balls of sock yarn……I find it really magical how the knitting gradually pulls into a square and I can’t predict the pattern on each individual one. Thank you for inspiring me to have a go. Xxx
Hi Hilary, that’s fantastic! Once you’ve done a few it becomes second nature! Personally, I love rustic! All these things improve with practice. Id love to see a photo as you progress. Happy knitting, Nicolette
Thank you for this tutorial – it’s in my winter to do list. I really love the squirrel 🙂
Thank you Mari. We were so lucky to be able to get so many photos of the red squirrel’s. The Mitred Square Blanket is such a great way to use up sock yarn! Happy Knitting, Nicolette
Hi Nicolette,
I have alot of tweed sock yarn I’m using to make this blanket! It’s the perfect project for it! I have a question for you on the edging. How many stitches would you use to make the I-cord edging for this blanket? 3 or 4? I’ve never knitted one before. Thank you!
Hi Karen, I’d use a 3 stitch I-cord edging. I used it for the Mitred Square Scarf that I made and I don’t think I’d have wanted anything bulkier than that around the edge. But when I’m not sure which will look best I normally try sampling both to see which I like better. The tweed sock yarn will look gorgeous as a blanket. I really hope you’ll email me a photo of your progress, I’d love to see your blanket. Nicolette
Hi Nicolette,
I have a lot of tweed sock yarn so I thought this would be the perfect project to make with it! How many stitches would you use to make an I-cord edging for this blanket? Around 3 or 4? Thank you!
Sorry, I didn’t answer your comment sooner. Had no internet or tv at all on Wednesday and internet connection has been incredibly slow and irratic since then. Very frustrating.
I adore your tutorials. They are so clear. The detail makes ALL the difference. Thanks so much
Thank you so much Hester
Gorgeous. Thank you for sharing. I would omit an edging until you are satisfied with the size of your blanket. An I-cord edging sounds fabulous. Great pictures. Awesome tutorial. Wonderful location.
Thank you Adriana. I’m pleased you enjoyed the tutorial. It is such a lovely blanket to knit. Love how the sock yarns look when put together. Nicolette
Fantastic and clear tutorial. I’ve been meaning to do something like this with the left overs for ages. Time to get started…
Thank you for this tutorial! I definitely plan to make one in my future, it looks like a perfect project to work on a bit at a time 🙂
I’m sure you’d really enjoy it. A great fun project.
Thank you so much for this tutorial! Very helpful. So you just keep making sections of 4 squares until the desired size? I love all of your tutorials
Hi Marty
You just keep adding squares in the same way: Square 2 (is how you attach all the squares along the bottom edge of blanket), Square 3 (is how you attach all the squares on the right hand side of the blanket), Square 4 (is how you attach and knit all the internal squares in the blanket. They also become the left hand edge and the top edge on the blanket).
It is great fun, no sewing up involved at all. The blanket just keeps growing in a wonderfully pleasing way!
Hope you try knitting the blanket. It is a lot of fun. Nicolette
I JUST FINISHED KNITTING THE BLANKET . IT IS LOT OF FUN AND THE END RESULTS ARE VERY EXCITING .
FARIDA KATHWARI
Glad you enjoyed knitting the blanket.