
The How to Knit Your Sock series covers knitting a sock in four step-by-step articles for knitters who are knitting their first sock. I have used Opal sock yarn in the lovely Fairies and Elves colour 5523 to knit this pair of socks.
- Part 1: covered the anatomy of a sock, knitting the cuff and the leg section.
- Part 2: explained knitting the heel flap and turning the heel
- How to Knit Your First Sock – Part 3: shows how to set up for the gusset and gusset shaping.
- Part 4: will look at knitting the foot, toe shaping and finishing.

- Ready to Knit the Gusset

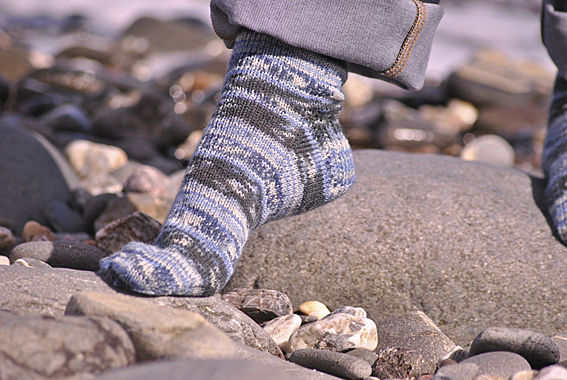
Your first sock should now look like the one in the photo above. You’ve just finished knitting turning the heel and now you are ready to start picking up and knitting stitches for the gusset set up. This is a very straight forward process and I will take you through it step by step.
Abbreviations
- k knit
- p purl
- ssk slip 2 stitches knitwise, one at a time, to right needle, then insert left needle from left to right into front loops and knit 2 stitches together – 1 stitch decreased
- p2tog purl 2 stitches together – 1 stitch decreased
- sl 1 slip 1 stitch purlwise
- st stitch
- st st stocking stitch/stockinette stitch
Gusset Set Up
I find that a sock made with a heel flap, turned heel and gusset always fits well and is very comfortable.
In the gusset set up you will be picking and knitting stitches along the two garter stitch edges of the heel flap. I shall explain, as you work through the gusset set up stage, how I prevent any little gaps or holes appearing.
Picking Up and Knitting
- Picking up the Stitch Through the \’bump\’

Pick up and knit 17 stitches along the side of the heel flap. I normally pick up and knit through the little ‘bump’ along the garter stitch edge of the heel flap. Although, it is a little more awkward, I don’t have little gaps when I do it this way.
- Remember to count the new stitches

When you reach the end of the heel flap edge and have 17 stitches on the needle, you will notice a ‘gap’, between the new stitches and the instep stitches.
- Fixing the little ‘gap’

Using the tip of your left needle, make 1 stitch by picking up and twisting (once) the yarn (from the previous complete knit round) between the instep stitches and the new picked up stitches.
- k2tog

K2tog (the new picked up stitch and the first instep stitch). After you knit a couple more stitches give the yarn a little tug just to tighten the stitches. This helps prevent the small hole that often shows at this point in a hand knit sock. Continue to knit across needle 2 and 3 until you are 1 stitch from the end of needle 3.
Slip the last stitch onto the right needle. Using the left needle make 1 stitch by picking up and twisting the yarn between the stitches (after the slipped stitch) then move the slipped stitch back onto the left needle, k2tog.
- Picking up and knitting the 17 stitches along the other side of the heel flap

Pick up and knit 17 stitches through the ‘bumps’. After the first couple of stitches, give the yarn a little tug just to tighten them at this point.
- Take a moment to look at your sock

Take a moment to look at your sock. The working yarn is at the end of needle 4. At this point you have stitches on all 5 of your needles. You have finished picking up all the stitches on the heel flap.
- The heel stitches

You will divide the 18 stitches on needle 5 (the stitches for the sole of your sock) between needle 4 and needle 1.
- Starting position for new rounds

Using needle 4 knit across the next 9 stitches of the sole (needle 5). This is now the starting point for the new rounds.
The Next Round
- Needle 1

Slip the remaining 9 stitches from needle 5 onto needle 1. Take a moment to count the stitches on each of the 4 needles:
- Needle 1: 26 stitches
- Needle 2: 15 stitches
- Needle 3: 15 stitches
- Needle 4: 26 stitches
You are at the starting point for the first of 2 knit rounds.
- Knit into the back of the stitch

Knit 9 stitches, then for the next 17 stitches (the ones picked up and knit in the previous round), knit into the back of each of the stitches. This creates a twist in the stitch and stops any little gaps from forming along the picked-up edge. Knit across the 30 instep stitches on needles 2 and 3. Then knit into the back of each of the next 17 stitches on needle 4, and knit 9 stitches.
Round 2: knit.
You are now ready to start the shaping for the gusset.
The Gusset
At its most basic, the gusset is simply the reduction of the extra stitches created in knitting the heel, to the original number of stitches cast on for the sock (15 stitches on each needle).
Round 1
Is the decrease round.
- Shaping the gusset – k2tog, k1

Knit to the last 3 sts on needle 1, then knit 2 stitches together, knit last stitch.
Knit across the 30 instep stitches on needle 2 and 3.
- Shaping the gusset – k1, ssk

For the first 3 stitches on needle 4, knit 1 stitch, then for the next two stitches slip 1 stitch, slip 1 stitch, then knit the two slipped stitches at the same time (ssk). Knit to the end of needle 4.
Round 2
Knit round 2.
Continue Shaping
Continue repeating round 1 and round 2 until there are 15 stitches on each of the 4 needles.
- Continue gusset shaping

When you knit this style of heel and gusset sock, you will find that the repeating pattern on a self-patterning sock yarn will be out of sync. There isn’t any way of preventing this except to use a different style of heels such as an afterthought heel or a strong heel.
You are ready to knit the foot section of your first sock. Continue to part 4 of how to knit your sock.
Leave a comment if you have any questions about part 3 of this series.
Would it be possible to email me a pdf? For some reason this website doesn’t load well on my phone and I keep getting prompted to download the website links instead of just redirecting to the next page. It’s really weird.
I am almost finished with my first sock thanks to your tutorial but I need to finish the toe and the page reset on my to part 3 instead of 4 and I can’t get back!
I don’t have a pdf for the pattern at this point in time. The website has been having a few issues on Google as I was using an older theme for it. I’ve been working on this and hopefully the issues will be ironed out soon.
Great instructions – helped me fix the problems I was having with the “basic” sock pattern I started with. I love written instructions – not into video tutorials. Thanks for helping me with my new sock obsession!
This is the best tutorial for socks- I had such fun with the first pair, that I just kept going and now have made 6 pairs total! I will always have a sock in the works- this is the best take along project. Thank you so much.
Congratulations! There is nothing quite like putting on a newly finished pair of hand knit socks! 🙂
I knit my very first sock using this pattern and am on the second sock. Clearly I am doing something wrong while trying to pick up and knit the 17 stitches on the side of the heel flap. I had to resort to using a needle go through the bump and then once space was made with the needle, insert a small crochet hook through the space and draw the working yarn through it to make a loop and then place each loop on the dpn. So very time consuming and tedious. I don’t know how else to get it to work.
Thank you so much for this brilliant (and easy to follow) pattern. I have made a pair, and absolutely love them! I would now like to make a pair using dk sock yarn. Could you tell me how to adapt the pattern so the socks end up the same size?
Hi Kajon, you may find my Daydream of A Castle in the Air sock post a helpful starting point. These socks were knit using a 6ply yarn that knits up as a DK weight yarn. Hope that helps, Nicolette
That’s perfect! Thank you so much for your help.
Hi, I currently just finished turning the heel so I am at 3 needles currently, one needle with 30 stitches and two with 15, i dont understand how i get back up to all 5 needles
Divide the 30 stitches onto 2 needles. That will give you 15 stitches on each of 4 needles and you will be knitting with the 5th. Hope that helps.
Hi, Nicolette! This tutorial has been super helfpul in knitting my first pair of socks so far. I was able to get through shaping and turning the heel fine, but got tripped up in shaping the gusset, particularly picking up and knitting and telling where to go from there. How do we know which needle is 1,2,3 etc.? Please let me know. Love the tutorial!! Thx.
Hi Ashtin, The starting point for every round is where you start your cast on and have the yarn tail. This is the centre back of the sock. Needle 1 is the first double pointed needle that you knit with to the left of the yarn tail. Needle 2 is the next one. Then Needle 3 and finally when you finish knitting Needle 4 you will be back at the yarn tail and the beginning of the next round.
When you have finished your heel turn you are not at the centre point of the sole of the sock when you start picking up and knitting the stitches along the heel flap using needle 1. You then knit across needle 2 and needle 3 which are the instep stitches across the top of your foot. You will be picking up and knitting the stitches along the other side of the heel flap on needle 4. When you reach the 18 stitches created when you did your heel turn shaping, you will knit across the first 9 of these using needle 4. Then slip the other 9 onto needle 1. This becomes the starting point of each round.
It is in essence a continuation from the “centre back” point of the sock to the “centre sole” point of the sock. If it helps you could place a locking stitch marker at this point on the sole to remind yourself that you are at the start of the round each time you reach it.
I hope this helps. If you’ve any other questions please ask. Delighted you’re finding the tutorial helpful. Happy sock knitting, Nicolette.
Thanks! Do you have any video tutorials for this sock?
Hi Ashtin, Sorry, I’ve never made a video tutorial. Happy New Year, Nicolette
When you say pick up and knit I would go through the bump and knit that stitch onto the needle or do I pick up all stitches and then knit
Thank You
Hi Diane, It is the first option, go through the bump and knit that stitch onto the needle. Then repeat. So it is one stitch at a time. Hope that helps. Happy Sock Knitting, Nicolette
Thank You
This might be a dumb question, but I’m not entirely sure what you mean by, “pick up and knit through the little ‘bump’ along the garter stitch edge of the heel flap”. I’m almost certain you don’t mean the little v’s as most tutorials indicate, but I can’t figure out what bumps you are referring to. Please help 🙁 I’m in love with knitting socks, and your tutorial has been the most comprehensive and helpful in my learning of the process.
Thanks 🙂
-Hadley Rose
Hi Hadley
Thank you for your question.
When you have finished knitting the heel flap, look closely along the edge. Where the garter stitch rows meet the edge they create a little bump. Between the bumps there is a short ‘bar’ of yarn. If you pick up and knit the stitches for the gusset using the ‘bar’ you will be more likely to get small gaps or holes being formed. If you use the ‘bump’ you should avoid this.
I hope this helps answer your question. So pleased you are enjoying knitting socks. They are so comfortable to wear when you have finished.
Happy sock knitting,
Nicolette